Beki Grinter

Sewing in the Middle Ages: Darts

In crafts and craftiness on March 16, 2024 at 9:55 am

It took me some years to get comfortable with the idea that I could adjust patterns. Seems silly in retrospect since sewing offers the promise of making things fit better. And of course the truth is that I did make adjustments. But very simple ones. The most obvious being that I would lengthen trouser legs and often adjust the tapering of the leg seam, I tend to like pants that are closer to drain pipes than palazzo. Here I want to talk about two more significant adjustments that are now fairly routine for me.

Note: in order to decide to do an adjustment I make a version following the instructions and cutting out the template as the pattern designer designed it. In the world of sewing this is often called a muslin, and was made in muslin fabric. I never make a muslin in muslin fabric, I buy and use cheap wovens and knits instead.

Lowering Normal Darts

Most patterns, even indie patterns, seem to be designed for a younger woman. As I’ve aged, so my boobs have lowered (proof of gravity I like to think). I believe this is relatively common. Anyway, if the darts in any pattern are going to come to the full apex of my bust they have to be moved down to meet me where I’m at.

There’s been many a blog post written and many a YouTube video made on how to do this for normal darts. Good terms to Google on are “lowering darts.” The gist is pretty simple. You measure the distance between where the dart on the pattern lands on your body and the actual place where the fullest part of your bust is. Say, that your bust is about an 1inch lower. Then you simply move the dart by making a box around it and lowering it. This involves cutting it out of the pattern piece and reinserting it at the lower point. Then you smooth the side seams out.

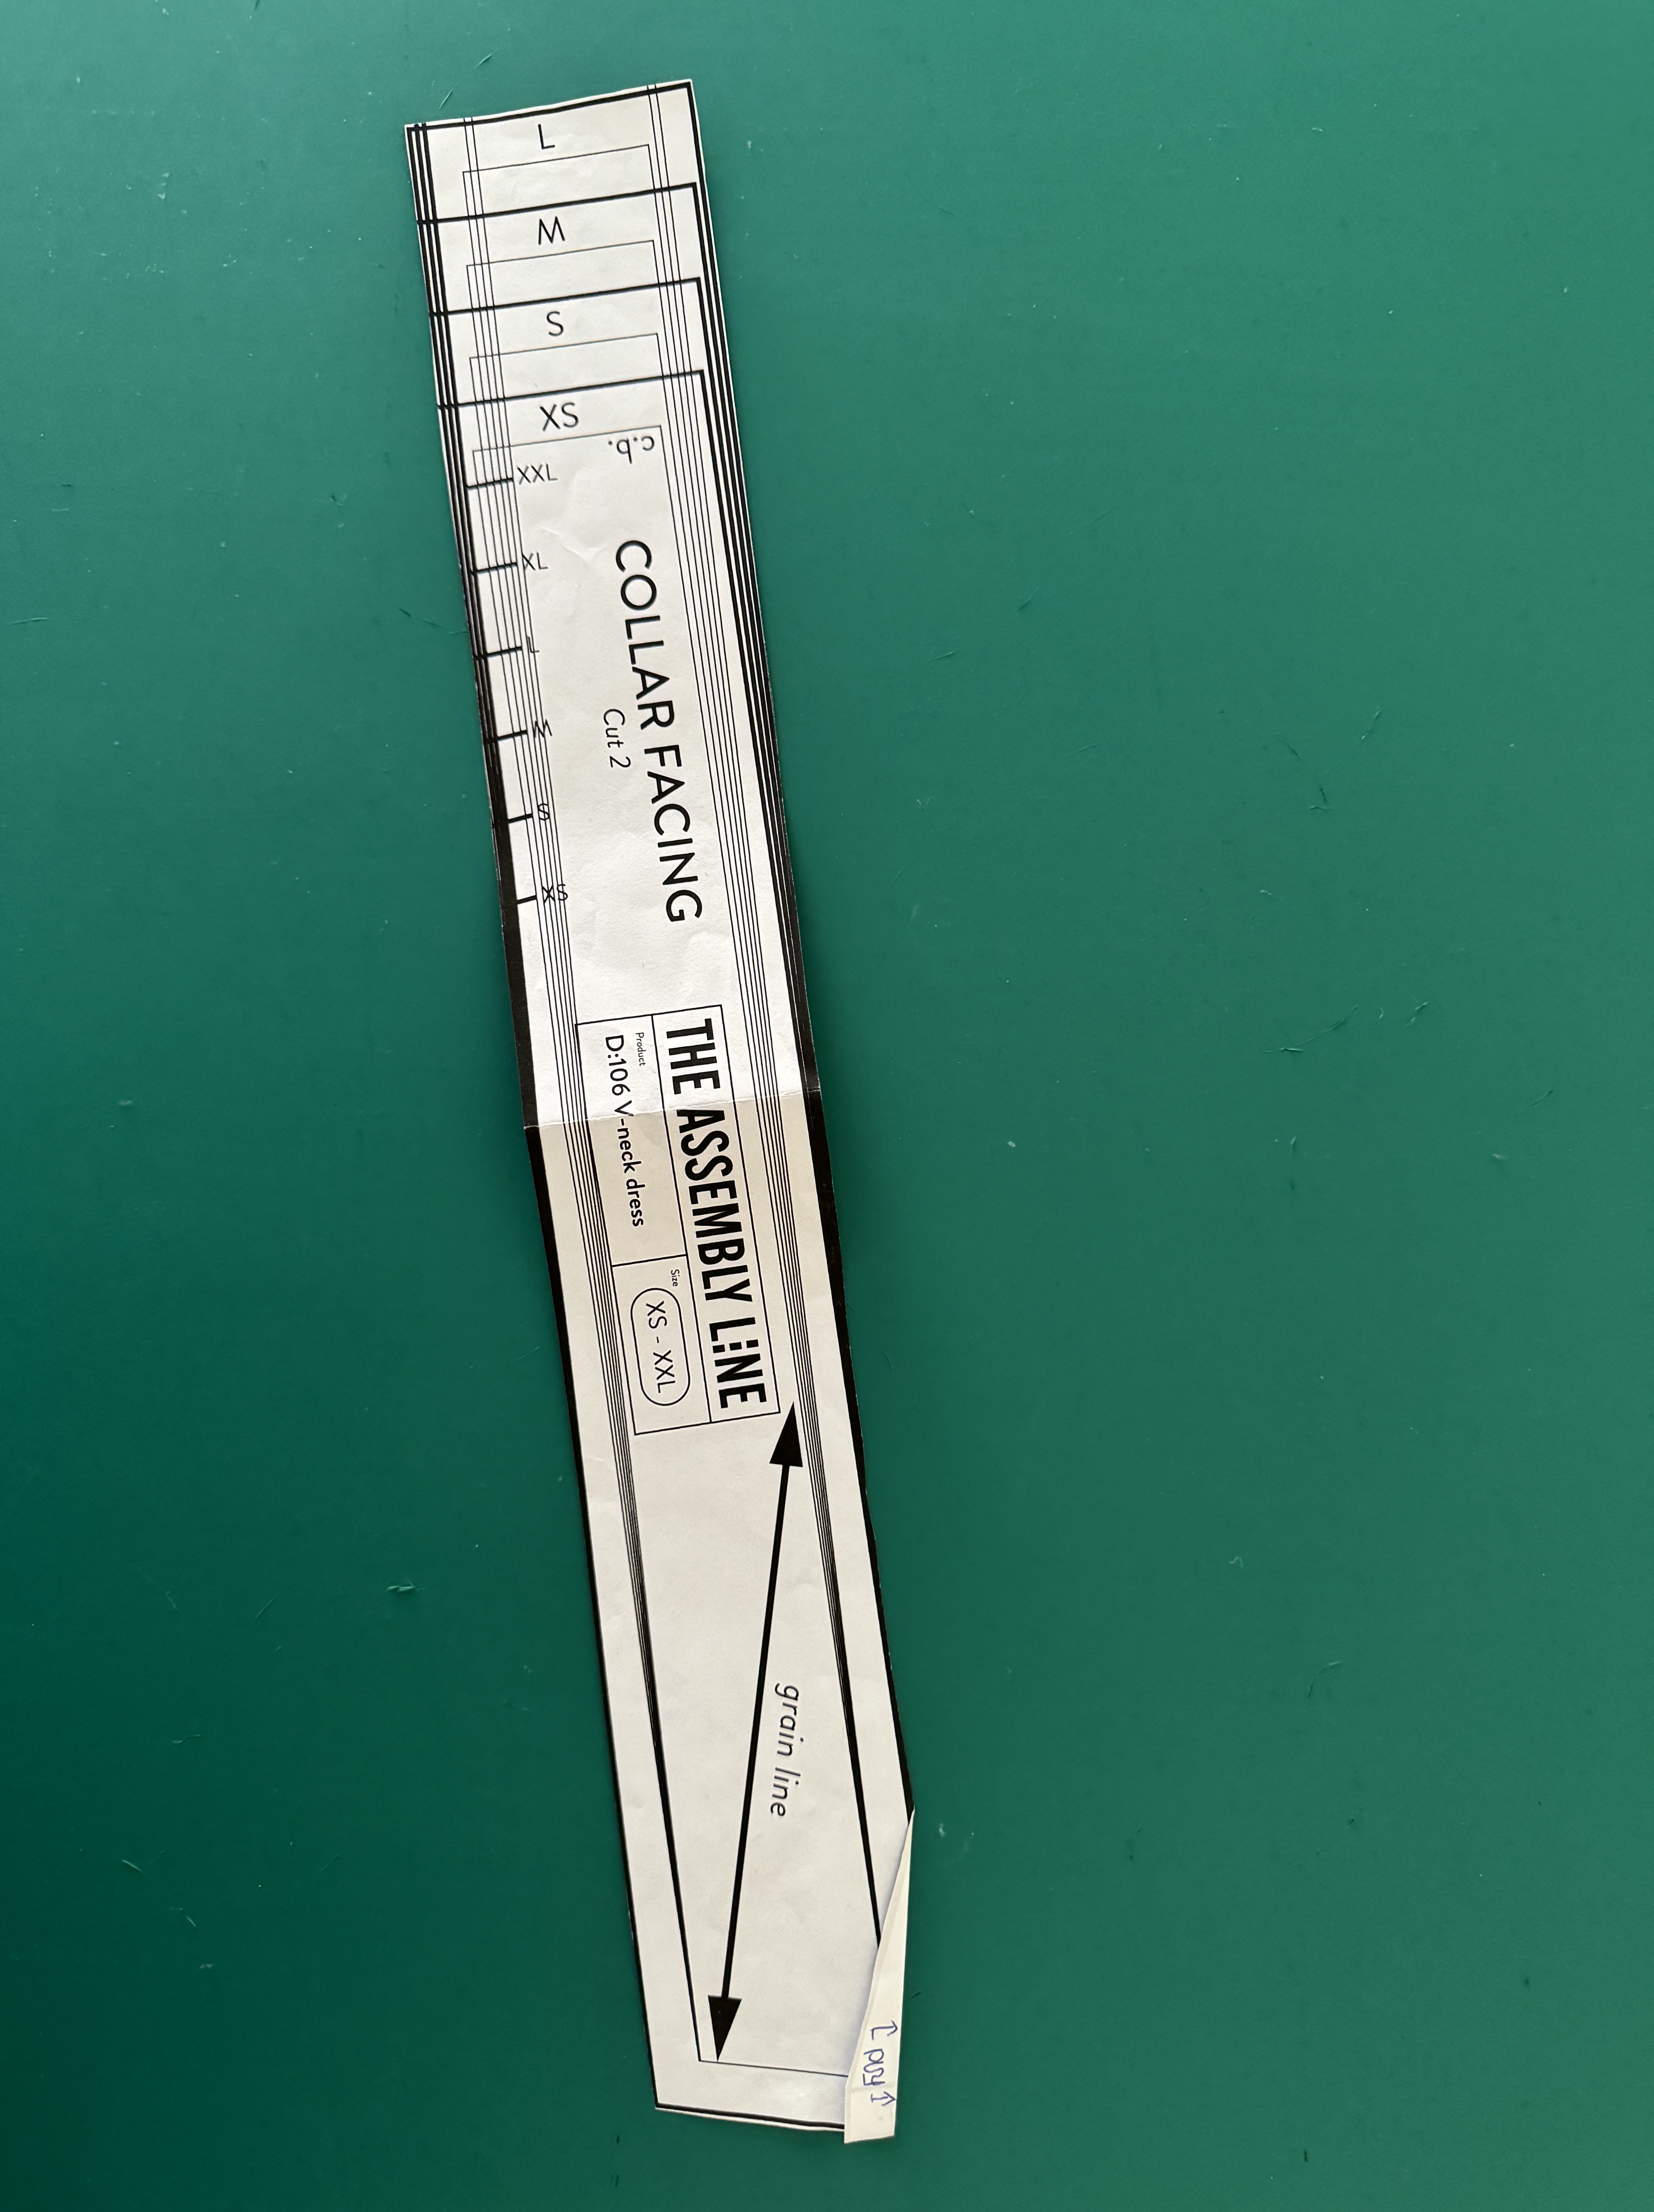
And this is what that looks like on my pattern. The box I cut around my dart and how I added room at the top of the box (the all white box) and how the box now covers some of the pattern at the bottom.

What About French Darts?

I wondered for a long time whether the principle was the same with a French Dart. A French Dart is a much bigger dart, it has a longer length and covers (in a diagonal) a much larger part of the pattern. A good example of the French Dart is the French Dart Shift by Maven Patterns. I love this pattern. It’s a lovely make and I’ve made it in both the woven fabrics that the pattern was designed for and knits as a tutorial suggested in the pattern hacks. (Shout out to Indie makers who provide these kinds of hacks, it’s a great way to get started in customizing a pattern, take someone else’s recommendations for switching it up. I honestly think it gave me the confidence to do more of my own).

I looked everywhere for French Dart adjustments and like Untitled Thoughts I couldn’t find much. Her post is a very detailed essay on how she altered a French Dart on her dress pattern. I have to admit I was intimidated. Then I decided to write to Mrs. Maven, the designer/owner of Maven Patterns. She wrote back very quickly (another shout out to the Indie Pattern companies I’ve written too and their kind and quick replies). She basically told me that I should use the same method I’d used for a normal dart!

And so I did. Here it is on my pattern. As you can see gravity had really done a number on where my dart needed to be, so this is about 2 inches lower. But it’s exactly the same principle just with a much larger box. But there’s one wrinkle, look to the bottom and you’ll see that there are notch markings for pockets. French Darts get much closer to the waist area, so they begin to interact with the pockets.

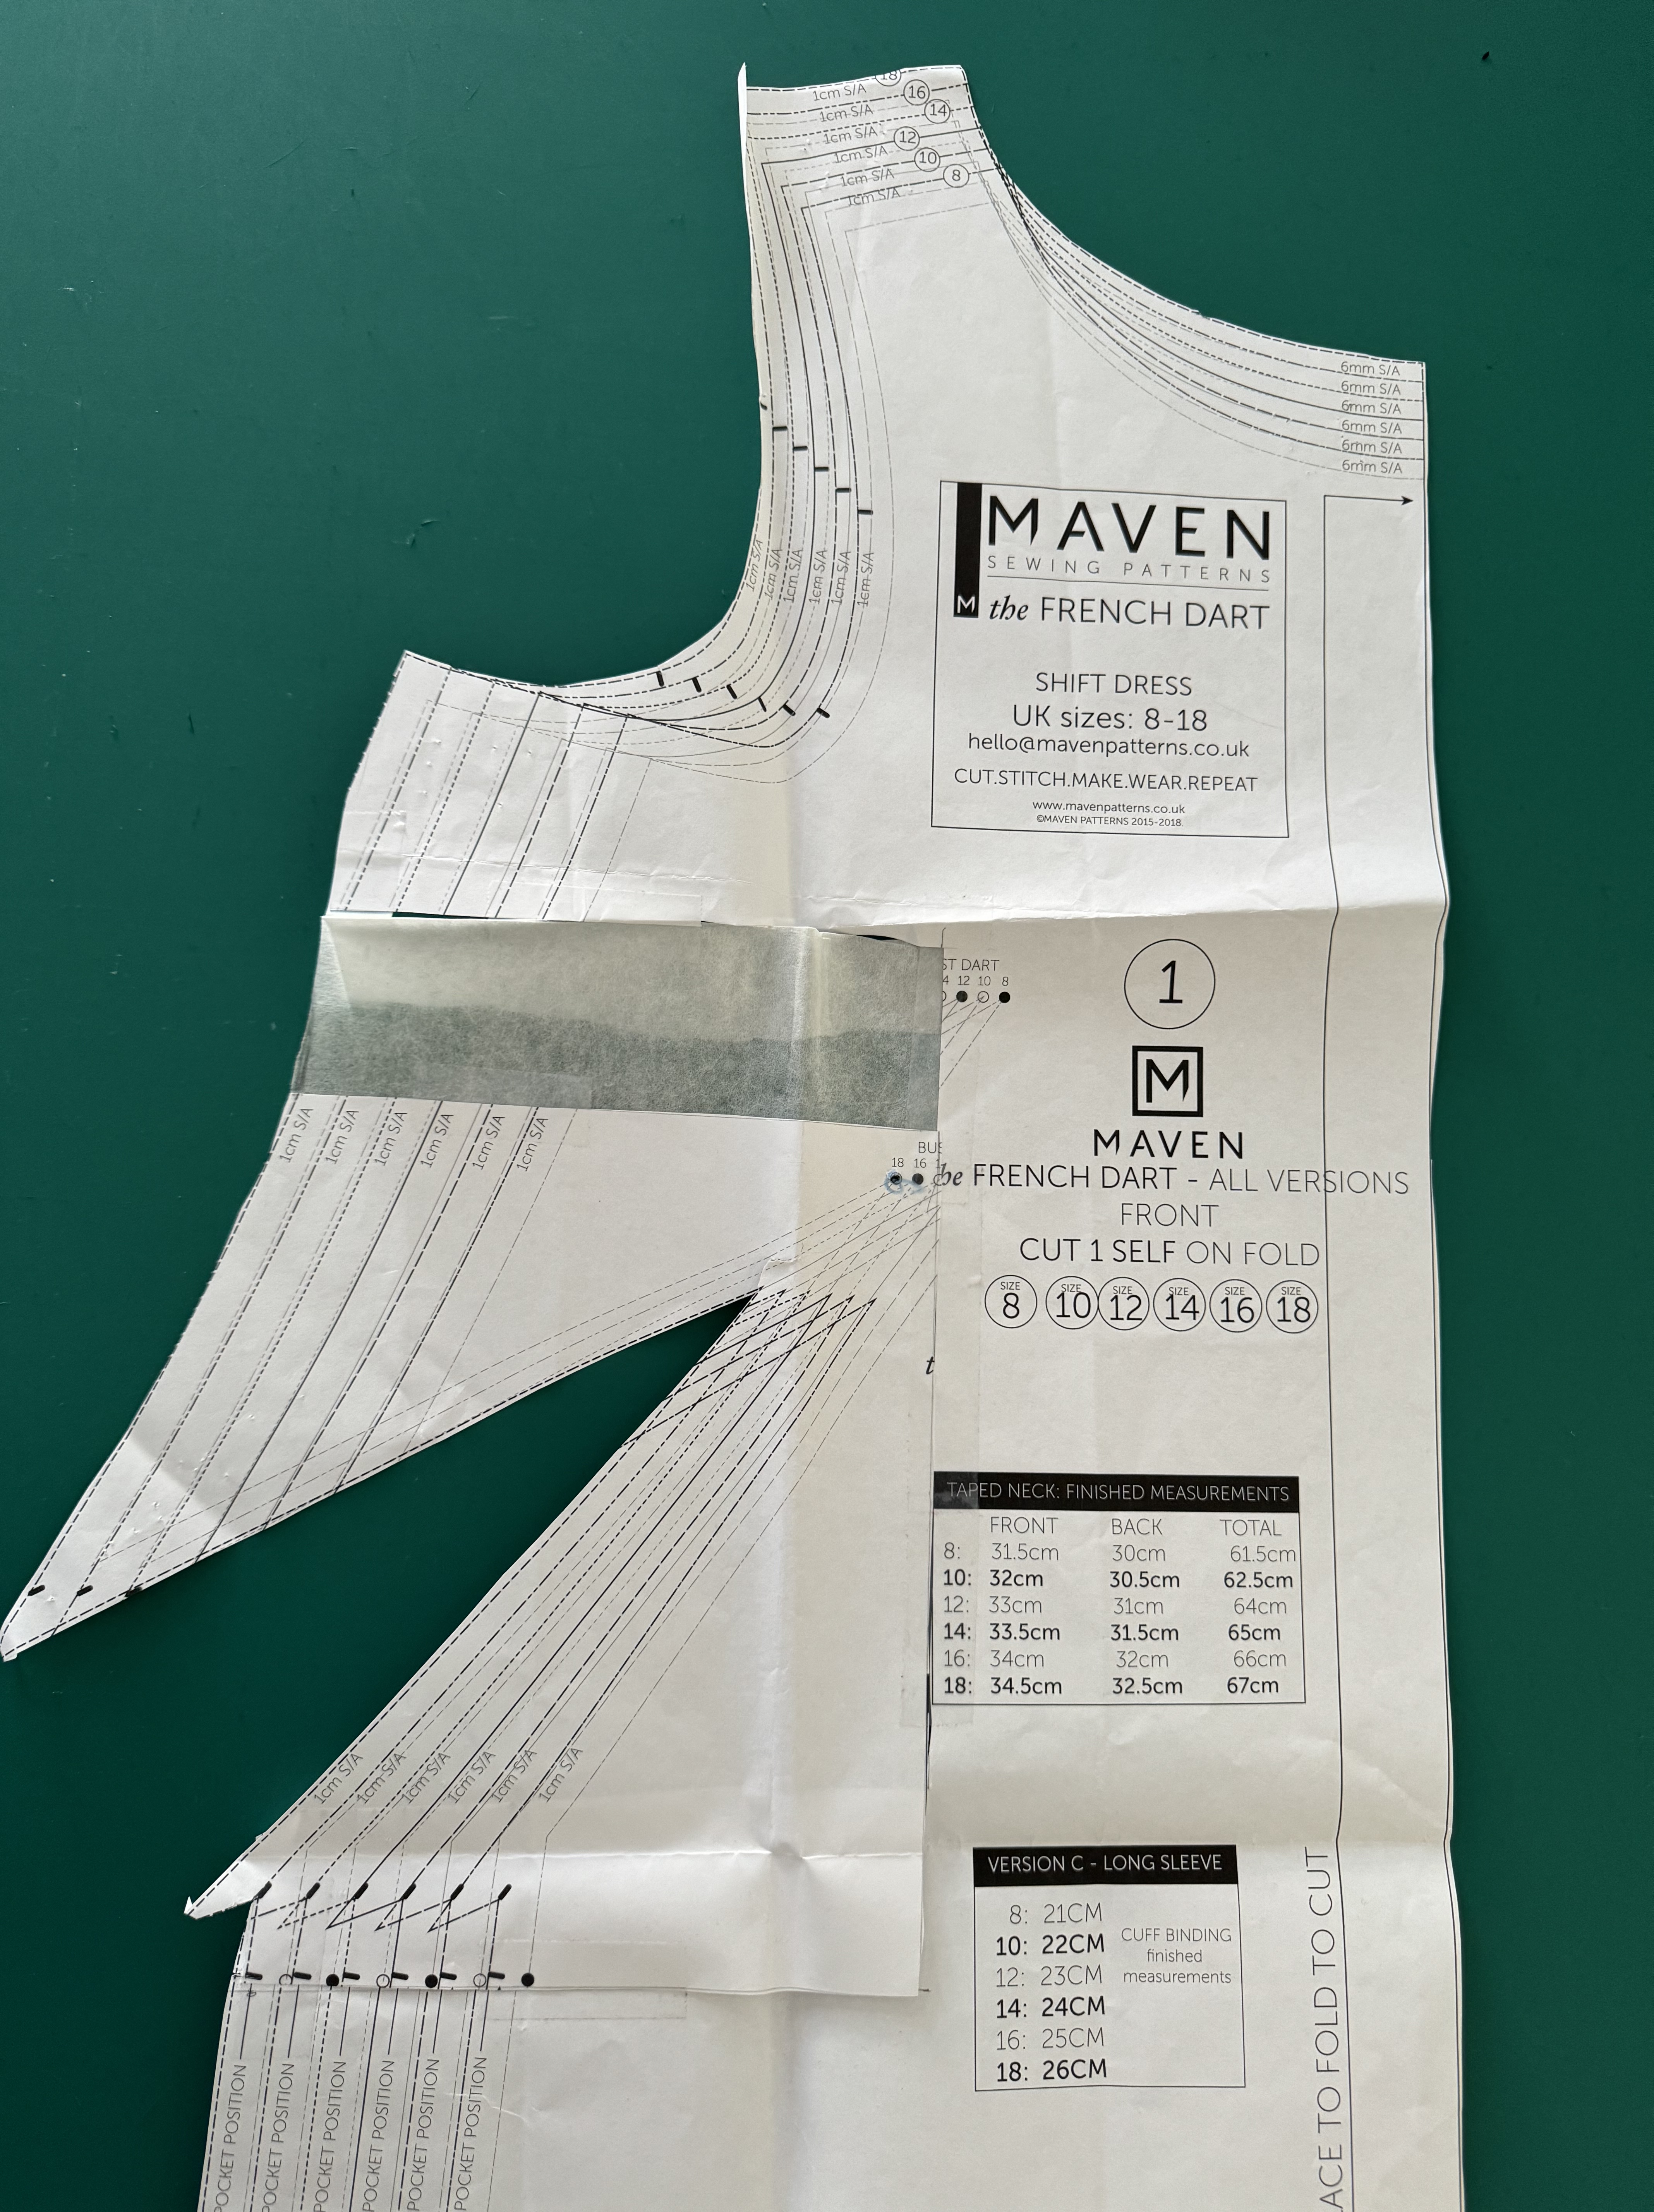
What to do about my pockets, because I certainly didn’t want to get rid of my pockets. Initially I thought I shouldn’t lower those too because the designer had put them there for a reason. But then I paused and two thoughts emerged. First, I could put the pockets where the French Dart ended, in other words they could overlap. The purpose of the dart is to create shaping in the bust area of the garment. At the side seam it functions just like a side seam although there is some extra bulk (e.g., the seams of the dart legs). So maybe that would matter on some fabrics but maybe it wouldn’t.

Second, why couldn’t I also move the pockets. In my case that turned out to be a winning idea. Turns out that my boobs are not the only part of my body that is non-custom. It turned out that lowering the pockets worked for me. It is now the case that the pockets on my version of the French Dart shift begin right after the new lowered French Dart.

In summary, I lowered the French Dart using the method suggested for normal darts and also lowered the pockets.

Alignment Matters

In crafts and craftiness on February 25, 2024 at 8:41 am

They (whoever they is, and they have a lot to answer for) say that matching patterns is a sign of good quality clothing. They might be right. For this sewist it’s been both a pain in the arse and a complete victory. I’m going to discuss three examples in this post and offer some advice.

Just Say No

The way to take a simple pattern and turn it into a complete nightmare is to try to match the pattern on a fabric. As an example I give you the Helen’s Closet Blackwood. This is a cardigan I’ve made many times and it’s a lovely pattern. The instructions are a joy to work with. After making several in my favourite colour, black, I decided that I would make one from some check fabric. Here is the final result.

Instead of it taking a couple of hours, it took the better part of two days. What’s a bit hard to see from this picture is how many things have to be cut to match. There’s the back and front (side seams). But at the bottom and around the top there’s a band. See below, there are also cuffs on the arms. It’s a lot of matching let me tell you.

From the outset I decided to cut the pieces as I needed them so that I could match them with what I had already sewn. Cutting is the most stressful part of the process for me, and so drawing it out like that wasn’t ideal. BUT… it was far simpler than trying to cut them all out and hope that they went together as expected. So about a million stressful hours later I had a cardigan that I’m very proud of, but weirdly I don’t wear a lot. It’s something to reflect on.

Also for my environmentally minded friends, this is not the most fabric efficient way to cut anything out. But for a fabric print pattern of this complexity I think not matching would be quite jarring, so I wonder whether it’s just best to avoid these sorts of fabrics if you want to be fabric conscious. Also, one other thing to know about fabric is that the print is not always even. I noticed that towards the selvedge edges the pattern had a slight warp in direction, it was no longer quite square. That also makes for challenges in alignment which I solved by not using that part of the fabric.

Here’s a somewhat simpler but still challenging version of the Helen’s Closet Blackwood. Stretch lace with a pattern and a border. I made the border of the front match the pattern of the front and back panels, but I used the flowers to trim the part of the border around the neck (so instead of a border made of two parts that meets in the back middle of the neck, its three pieces. Then I cut the sleeves so that there was no hem at the bottom but the border of the lace itself.

A Match that led to a Happy Ending

I love the Assembly Line V-Neck Dress, which I make as a tunic length. The original pattern has seams at the centre front and centre back. If you look at the image on the right you can see the centre back one clearly through the v-neck. The centre front one embodies what is wrong with centre seams, while ground and the sky were aligned, we see the same Frida appearing twice. The image on the left is the same fabric, same top, but I removed the centre front and back seams and thus the pattern continued uninterrupted, the easiest way to make a patterned fabric line up.

So how did I do this. Instead of cutting out two front pieces and two back pieces, I cut a front and a back on the fold of the fabric. The Assembly Line really makes this simple because their cutting outlines include the seam allowance, so what I did was carefully fold back the seam and made the seam line the centre fold line. Woot. Here’s a picture of the front piece.

The back was simple to do, and so was the front. But the front has a V-Neck and what going down to one front piece means is that instead of making the V by sewing two pieces together, you have a V shape cut into the single piece of fabric. The first implication of this is that you need to adjust the facing… or maybe you could still make two pieces and sew them together but I decided to make the facing into a single piece.

Probably the hardest part of doing all of this is trying to sew the V neckline with a sharp point. The best advice I’ve read (and I can’t find it publicly online, so I suspect it was in one of the sewing Facebook groups I’m in) is to sew towards the point and then rather than making a V in the stitching make something like this \ _ / with stitches. That and some comprehensive clipping to make the fabric lie flat. Here’s a picture of the backside of the front to give you a feel for how the centre seam removed works from the backside.

Placket Woes

At some point I decided that would make shirts for the hubby. Perhaps I was getting a bit embarrassed about the amount of clothing I had me made for me. It took a while though because shirts were dead to me as things to sew after I failed my O-Level in sewing. (Yes I failed and yes there’s such a thing to fail). Anyway, at some point I decided that I could make shirts. And now I feel a lot less guilty when I suggest a trip to a fabric store because there’s usually a good opportunity to find shirt fabric.

So Liberty of London makes some lovely fabrics and some of them, like Nouveau Peacock below have a very strong geometric pattern. Not only did it feel necessary to have a go at matching the side seams it seemed especially crucial to match the front. For the shirt pattern I used Wardrobe By Me, Jensen shirt.

This was another case of cut one front piece out and then cut the other in response to it. What makes this hard is that shirts have plackets. That’s the name for the piece of the shirt where the buttonholes sit on one side and the buttons on the other. It’s made, in this case, by folding the centre seam over twice. So, fold each centre seam over twice. BUT, you don’t match the two together, because the left (left when worn) sits over the right, so the actual match takes the left folded over + the width of the placket on the right side. I drew the width of the placket onto the pattern piece so that I could know where I needed to align the left side piece too.

Here’s what that looks like on the pattern piece. You can see the two dotted lines down the side of the front, those are the first two folds of the placket. The third line, my blue annotation is where the pattern on the right side has to match on the left. Now since you cut the right and the left sides from the same piece, what I typically do is cut the left first, fold and iron it and then cut the right. Its fiddly but it works for me (I suspect projector cutting would be particularly good for this).

Here’s the final result and I have to say Im pretty pleased with it.

The Lining I Didn’t Expect

In crafts and craftiness on February 12, 2024 at 10:36 am

So I like a good cardigan and sewing was always going to facilitate this hobby. Recently I found Sinclair Patterns Candy, which I like because of the long front drape. I made one version as the pattern calls for, but I didn’t like how the hem showed on the inside. This of course meant it was time to experiment. First, I made a small lining. What I mean by this is that I made an extra piece, front lining, that traced the front neck and side collar, and some of the bottom hem. I sewed it up and now when the front drapes open you see the lining and not the back of the fabric. That was pretty simple.

Then I wondered what it would be like to make the lining the entire front panel. This also coincided with my thought that perhaps I should make a cardigan that wasn’t black. The skull and roses fabric seemed to fit the bill and so I made it. I simply cut four front panels instead of two. I followed the regular construction but before I set the sleeves I sewed the lining panels to the front pieces. Then I set the sleeves with three pieces of fabric at the front, the sleeve, the lining and the front panel.

After setting the sleeves flat, I sewed the side seam sewing the arms and the side seams together. At this point I closed the lining and the front of the front part of the cardigan together (and sewed them also to the back). It was shortly after I had done this I realized that there was no easy way to sew up the hem. I did eventually figure out a hack (cut into the side seam to the depth of the hem, then fold the hem pieces into and sew them together using an edge stitch on the outside. Then in the back piece I could flip up and hem that normally.

After this rather frustrating experience I suppose it was inevitable that I would decide to try one more time. This time I decided to line the whole cardigan. I was initially inspired by this post about lining a similar looking cardigan. I read it closely and I think the way she made it work was by having the seams exposed on the side seams. I could have done that but then I wondered whether I could simply line the entire thing, including the sleeves, and that led me to bagging.

Bagging is a technique that uses the machine to sew together most of the lining on a jacket. What makes it a bit mad is that it’s an exercise in geometry, particularly for the sleeves. How you sew them together is difficult to impossible to explain but it’s also brilliant and means that you have an almost entirely enclosed set of seams. It took me the better part of a day but I figured it out. And now I have a cardigan that is Hacci Sweater knit on the front and lined with Polartec fleece that will be super on those cold cycling in days in Atlanta. And of course it was back to black.

While I like the outcome of the black with lining, I really like the skulls cardigan so here’s another shot of it. For the curious, FabricMart is the source of fabrics for the skulls and the fully lined cardigan. Joann’s brushed knit was used for the first cardigan in this post.