簡易RSSリーダ

このブログを書いているWordPressにはRSS機能が標準的に存在します、例えばこのブログのRSSはコチラ

簡単にRSSのタイトルだけを表示するならこんな感じでしょうか。

MainWindow.xaml.cs

namespace SimpleRssReader
{
    using System.IO;
    using System.Net.Http;
    using System.ServiceModel.Syndication;
    using System.Windows;
    using System.Xml;
    public partial class MainWindow : Window
    {
        public MainWindow(){
            InitializeComponent();
        }

        private async void moveButton_Click(object sender, RoutedEventArgs e)
        {
            HttpClient client = new HttpClient();
            var result = await client.GetStringAsync(RssUri.Text);

            var reader = XmlReader.Create(new StringReader(result));
            var feed = SyndicationFeed.Load(reader);
            rssResult.ItemsSource = feed.Items;
        }
    }
}

MainWindow.xaml

<Window x:Class="SimpleRssReader.MainWindow"
        xmlns="http://schemas.microsoft.com/winfx/2006/xaml/presentation"
        xmlns:x="http://schemas.microsoft.com/winfx/2006/xaml"
        Title="MainWindow" Height="229" Width="525">
    <Window.Resources>
        <DataTemplate x:Key="DataTemplate1">
            <Grid>
                <TextBlock HorizontalAlignment="Left" Margin="2,0,0,0" TextWrapping="Wrap" Text="{Binding Title.Text}" VerticalAlignment="Top"/>
            </Grid>
        </DataTemplate>
    </Window.Resources>
    <Grid>
        <Grid.RowDefinitions>
            <RowDefinition Height="56*"/>
            <RowDefinition Height="283*"/>
        </Grid.RowDefinitions>
        <Grid.ColumnDefinitions>
            <ColumnDefinition Width="101*"/>
            <ColumnDefinition Width="321*"/>
            <ColumnDefinition Width="95*"/>
        </Grid.ColumnDefinitions>
        <TextBox x:Name="RssUri" Grid.Column="1" TextWrapping="Wrap" Text="https://tocsworld.wordpress.com/?feed=rss2" Margin="3"/>
        <Button x:Name="moveButton" Content="Move" Grid.Column="2" Margin="3,3,3,0" Height="23" VerticalAlignment="Top" Click="moveButton_Click"/>
        <Label Content="Title" Height="29" VerticalAlignment="Bottom"/>
        <ListBox x:Name="rssResult" Grid.Row="1" Grid.ColumnSpan="3" Margin="3,5" ItemTemplate="{DynamicResource DataTemplate1}"/>
    </Grid>
</Window>

実行時の様子はこちら、SyndicationFeedからはIEnumerable<SyndicationItem>が得られます、このタイトルをデータテンプレートを使ってTextBlockでバインド・表示させているだけです。

simple_rss

これに気象予報のRSSはこちらで提供されているので組み合わせるとお天気ソフトが。。


任意3D文字が回転するスクリーンセーバー

WPFでTextから2DのPathに変換しました。じゃあ3Dは?というのが浮かんだ内容ですが、これが結構難しい。行きついた情報はこちら、あのProgramming Windowsで有名なCharles Petzold氏のMSDNマガジンへの寄稿でした。

詳細は追って理解するとしてこれを使ったスクリーンセーバを作ってみます。WPFによるスクリーンセーバーの作り方はこちら、非常に分かりやすく解説されています。


App.xaml.cs

namespace WpfText3DScreenSaver
{
    using System.Globalization;
    using System.Windows;

    public partial class App : Application
    {
        private MainWindow window = new MainWindow();

        private void Application_Startup(object sender, StartupEventArgs e)
        {
            if (e.Args.Length > 0){
                string mode = e.Args[0].ToLower(CultureInfo.InvariantCulture);
                if (mode.StartsWith("/c")){
                    ShowConfig();
                    return;
                }
                else if (mode.StartsWith("/p"))
                {
                    return;
                }
            }
            SaveScreen();
        }

        private void ShowConfig()
        {
            var settingWindow = new TextSettingWindow();
            settingWindow.ShowDialog();
        }
        private void SaveScreen()
        {
            window.Topmost = true;
            window.Left = 0;
            window.Top = 0;
            window.WindowState = WindowState.Maximized;
            window.Show();
        }
    }
}

App.xaml

<Application x:Class="WpfText3DScreenSaver.App"
             xmlns="http://schemas.microsoft.com/winfx/2006/xaml/presentation"
             xmlns:x="http://schemas.microsoft.com/winfx/2006/xaml"
             Startup="Application_Startup">
    <Application.Resources>
    </Application.Resources>
</Application>

StartupUriでなく、Startupになっているのに注意。Startupとしてはcsで定義したハンドラを指定しています。設定ウィンドウはこんな感じ。

 TextSettingWindow.xaml.cs

namespace WpfText3DScreenSaver
{
    using System.Windows;

    public partial class TextSettingWindow : Window
    {
        public TextSettingWindow()
        {
            InitializeComponent();
            textbox.Text = Properties.Settings.Default.Text3D;
            setbutton.Click += (_, __) =>{
                DialogResult = true;
                Properties.Settings.Default.Text3D = textbox.Text;
                Properties.Settings.Default.Save();
                Close();
            };
            cancelbutton.Click += (_, __) =>
            {
                DialogResult = false;
                Close();
            };
        }
    }
}

TextSettingWindow.xaml

<Window x:Class="WpfText3DScreenSaver.TextSettingWindow"
        xmlns="http://schemas.microsoft.com/winfx/2006/xaml/presentation"
        xmlns:x="http://schemas.microsoft.com/winfx/2006/xaml"
        Title="TextSettingWindow" Height="104" Width="300">
    <Grid>
        <Grid.ColumnDefinitions>
            <ColumnDefinition Width="140"/>
            <ColumnDefinition Width="*"/>
            <ColumnDefinition Width="*"/>
        </Grid.ColumnDefinitions>
        <Grid.RowDefinitions>
            <RowDefinition Height="2*"/>
            <RowDefinition Height="*"/>
        </Grid.RowDefinitions>
        <TextBox Name="textbox" Grid.ColumnSpan="3" TextWrapping="Wrap" Text="TextBox"/>
        <Button Name="setbutton"  Content="設定" Grid.Column="1" Grid.Row="1"/>
        <Button Name="cancelbutton" Content="キャンセル" Grid.Column="2" Grid.Row="1"/>
    </Grid>
</Window>

settingwindow

ポイントって言うほどではないんですが、設定時と実行時ではプログラム引数違いなだけでそれぞれ終了してしまうため、設定を保持しておく必要があります。ここではフツーにSettingsを使って設定を保持しておくことにします。


さて、メインとなるウィンドウはこちら。

 MainWindow.xaml

<Window x:Class="WpfText3DScreenSaver.MainWindow"
        xmlns="http://schemas.microsoft.com/winfx/2006/xaml/presentation"
        xmlns:x="http://schemas.microsoft.com/winfx/2006/xaml"
        xmlns:petzold="clr-namespace:Petzold.Text3D;assembly=Petzold.Text3D"
        Title="MainWindow" Height="350" Width="525" WindowStyle="None">
    <Grid>
        <Viewport3D>
            <petzold:SolidText x:Name="field"
                       Text="任意文字"
                       FontFamily="Times New Roman"
                       FontWeight="Bold"
                       Origin="-1.5 0.5" Depth="0.5">
                <petzold:SolidText.Material>
                    <MaterialGroup>
                        <DiffuseMaterial Brush="Blue" />
                        <SpecularMaterial Brush="White" />
                    </MaterialGroup>
                </petzold:SolidText.Material>

                <petzold:SolidText.BackMaterial>
                    <MaterialGroup>
                        <DiffuseMaterial Brush="Red" />
                        <SpecularMaterial Brush="White" />
                    </MaterialGroup>
                </petzold:SolidText.BackMaterial>

                <petzold:SolidText.SideMaterial>
                    <MaterialGroup>
                        <DiffuseMaterial>
                            <DiffuseMaterial.Brush>
                                <LinearGradientBrush StartPoint="0 0"
                                                 EndPoint="0 1">
                                    <GradientStop Offset="0" Color="Blue" />
                                    <GradientStop Offset="1" Color="Red" />
                                </LinearGradientBrush>
                            </DiffuseMaterial.Brush>
                        </DiffuseMaterial>
                        <SpecularMaterial Brush="White" />
                    </MaterialGroup>
                </petzold:SolidText.SideMaterial>

                 <!--Transform.-->
                <petzold:SolidText.Transform>
                    <RotateTransform3D>
                        <RotateTransform3D.Rotation>
                            <AxisAngleRotation3D x:Name="rotate" Axis="1 1 0" />
                        </RotateTransform3D.Rotation>
                    </RotateTransform3D>
                </petzold:SolidText.Transform>
            </petzold:SolidText>

             <!--Lights.-->
            <ModelVisual3D>
                <ModelVisual3D.Content>
                    <Model3DGroup>
                        <AmbientLight Color="#404040" />
                        <DirectionalLight Color="#C0C0C0" Direction="2 -3 -1" />
                    </Model3DGroup>
                </ModelVisual3D.Content>
            </ModelVisual3D>

             <!--Camera.-->
            <Viewport3D.Camera>
                <PerspectiveCamera Position="0 0 8" UpDirection="0 1 0"
                               LookDirection="0 0 -1" FieldOfView="45" />
            </Viewport3D.Camera>
        </Viewport3D>

         <!--Animation.-->
        <Grid.Triggers>
            <EventTrigger RoutedEvent="Page.Loaded">
                <BeginStoryboard>
                    <Storyboard>
                        <DoubleAnimation Storyboard.TargetName="rotate"
                                     Storyboard.TargetProperty="Angle"
                                     From="0" To="360" Duration="0:0:15"
                                     RepeatBehavior="Forever" />
                    </Storyboard>
                </BeginStoryboard>
            </EventTrigger>
        </Grid.Triggers>
    </Grid>
</Window>

MainWindow.xaml.cs

namespace WpfText3DScreenSaver
{
    using System.Windows;

    public partial class MainWindow : Window
    {
        public MainWindow()
        {
            InitializeComponent();
            field.Text = Properties.Settings.Default.Text3D;
            this.MouseMove += (_, __) => Close();
        }
    }
}

3D表示は全体的にPetzold.Text3D DLLに依存しています。MSDNからソースコードも落とせるので落として見ると良いかと。これをexeとしてビルドした後、srcに拡張しを変更して、ファイルを右クリック→インストールを実行した様子はこちら。

setting

これを実行した画面キャプチャした様子はこちら。

scrsave

Text→3Dへの変換は追って理解していくことにします。

WPF Text→Path変換2

恥ずかしいエントリを公開しないよう見直していたら他の簡単な方法をまた見つけた。

WPFでTextからPathへの変換処理、前々回ご紹介したところですが以下のようにするともっと簡単にできました。FormattedTextを使う方法でこんな感じ。

StringToPathConverter2.cs

namespace WpfTextClip
{
    using System.Globalization;
    using System.Windows.Media;
    using System.Windows;
    using System.Windows.Shapes;

    public class StringToPathConverter2
    {
        public static System.Windows.Shapes.Path ConvertToPath(string text)
        {
            var formatedText = new FormattedText(text, new CultureInfo("ja"), FlowDirection.LeftToRight,
                new Typeface("verdana"), 150, Brushes.Black);
            Path path = new Path();
            path.Data = formatedText.BuildGeometry(new Point());
            return path;
        }

    }
}

これを以前同様、MainWindowのボタンハンドラでGridをclipするように

MainWindow.xaml.cs

namespace WpfTextClip
{
    using System.Windows;
    public partial class MainWindow : Window
    {
        public MainWindow()
        {
            InitializeComponent();
        }

        private void convertbutton_Click(object sender, RoutedEventArgs e)
        {
            targetCanvas.Clip = StringToPathConverter2.ConvertToPath(textBox.Text).Data;
        }
    }
}

処理してやると以下のようになります。

texttopath2

やりたいこととしてはできていますね。前々回の内容はGraphicsPath→Pathへの変換という意味では意味がありますが、Textからの変換だと上の方法のほうが楽です。


WPF 波紋ドロップアニメーション

Effect効果をちゃんと把握しておらず恥ずかしいエントリを先日公開したところで、Effectを確認しておこうと思いました;

1.RippleEffect

作成するのは画面上のImageに対してクリック(or ドロップ操作)をすると画像に波紋が描かれるようなもの。RippleEffectを使います、Blendから設定するか、VisualStudioからだとBlendのSDKをインストールした上でMicrosoft.Expression.Effectsを参照設定する必要があります。

MainWindow.xaml

<Window
        xmlns="http://schemas.microsoft.com/winfx/2006/xaml/presentation"
        xmlns:x="http://schemas.microsoft.com/winfx/2006/xaml"
        xmlns:ee="http://schemas.microsoft.com/expression/2010/effects"
        x:Class="WpfRippleEffectTest.MainWindow"
        Title="MainWindow" Height="245" Width="286">
	<Window.Resources>
		<Storyboard x:Key="RippleEffectStoryboard">
			<DoubleAnimationUsingKeyFrames Storyboard.TargetProperty="(UIElement.Effect).(ee:RippleEffect.Magnitude)" Storyboard.TargetName="image">
				<EasingDoubleKeyFrame KeyTime="0" Value="0.4"/>
				<EasingDoubleKeyFrame KeyTime="0:0:4" Value="0"/>
			</DoubleAnimationUsingKeyFrames>
            <DoubleAnimationUsingKeyFrames Storyboard.TargetProperty="(UIElement.Effect).(ee:RippleEffect.Frequency)" Storyboard.TargetName="image">
                <EasingDoubleKeyFrame KeyTime="0" Value="30"/>
                <EasingDoubleKeyFrame KeyTime="0:0:4" Value="0"/>
            </DoubleAnimationUsingKeyFrames>
        </Storyboard>
	</Window.Resources>
	<Grid>
		<Image x:Name="image" Source="Lighthouse.jpg" Stretch="UniformToFill" MouseDown="image_MouseDown">
			<Image.Effect>
				<ee:RippleEffect x:Name="rippleEffect" Frequency="0"/>
			</Image.Effect>
		</Image>

	</Grid>
</Window>

MainWindow.xaml.cs

namespace WpfRippleEffectTest
{
    using System.Windows;
    using System.Windows.Input;
    using System.Windows.Media.Animation;

    public partial class MainWindow : Window
    {
        public MainWindow()
        {
            InitializeComponent();
        }

        private void image_MouseDown(object sender, MouseButtonEventArgs e)
        {
            var clickedPos = e.GetPosition(image);
            rippleEffect.Center = new Point(clickedPos.X / image.ActualWidth, clickedPos.Y / image.ActualHeight);
            var storyboard = FindResource("RippleEffectStoryboard") as Storyboard;
            storyboard.Begin();
        }
    }
}

dropeffect

Easingをうまく設定することや、Storyboardをいくつも作成して複数の波紋を再現するなどの凝る要素があります。RippleEffectはアニメーション内で使うのがほとんどかと思われます。ファイルがドロップされると波紋が浮き立つというソフトがありましたが、こちらはRippleEffectは使わず自作しているようですね。。


2.その他のEffect

Blend付属のEffect以外にもWPF Shader Effect Libraryというライブラリがあり、ごく簡単な手順で組込むことができます。ダウンロードするとわかりますが、HLSLでShaderが定義されており、著作権等を考慮して一部転載も避けますがRippleEffectのそれもあります。手順は、

HLSL(.fx)→コンパイル→.psファイル→C#からUriでファイル指定してロード

となっています。このライブラリを使うだけならEffectクラスがあるので不要ですが、カスタムEffectをHLSLから記述する場合の手順がこちらで紹介されています。


WPF Text(GraphicsPath)→Path変換

WPFでは所望の形にElementを切り出せますが、System.Windows.Shapes.Pathを自作するのはちょっと苦労。例えば文字列のPathを取得しようと思うと簡単にはできません、System.Drawing.Drawing2D.GeometryPathならばStringから直接変換できるわけで、今回はSystem.Drawing.Drawing2D.GeometryPathからSystem.Windos.Shapes.Pathを変換してみようというトライ。

これ地味に面倒で、いくつか関連サイトあるけどどこかごまかしているような。。

System.Windows.Shapes.Pathを作成するとGeometryができるので、それをCanvas.Clipに設定することで切り抜いてやろうと思います。確認用UIはこんな感じ。

 MainWindow.xaml

<Window x:Class="WpfTextClip.MainWindow"
        xmlns="http://schemas.microsoft.com/winfx/2006/xaml/presentation"
        xmlns:x="http://schemas.microsoft.com/winfx/2006/xaml"
        xmlns:me="clr-namespace:WpfTextClip"
        Title="MainWindow" Height="350" Width="525">
    <Window.Resources>
        <me:StringToPathConverter x:Key="strPathConverter"/>
    </Window.Resources>
    <Grid>
        <Grid.ColumnDefinitions>
            <ColumnDefinition Width="*"/>
            <ColumnDefinition Width="*"/>
        </Grid.ColumnDefinitions>
        <Grid.RowDefinitions>
            <RowDefinition Height="7*"/>
            <RowDefinition Height="*"/>
        </Grid.RowDefinitions>
        <TextBox x:Name="textBox" Grid.Row="1" TextWrapping="Wrap" Text="TextBox"/>
        <Canvas x:Name="targetCanvas" Grid.ColumnSpan="2" Background="Black"/>
        <Button x:Name="convertbutton" Content="Convert" Grid.Column="1" Grid.Row="1" Click="convertbutton_Click"/>
    </Grid>
</Window>

mainwindow

Mainwindow.xaml.cs

namespace WpfTextClip
{
    using System.Windows;
    public partial class MainWindow : Window
    {
        public MainWindow()
        {
            InitializeComponent();
        }

        private void convertbutton_Click(object sender, RoutedEventArgs e)
        {
            targetCanvas.Clip = StringToPathConverter.ConvertToPath(textBox.Text).Data;
        }
    }
}

Convertボタンを押すと、TextBoxに指定された文字列で上のCanvasをClipしてやる構図。ということで本題であるGeometryPathからPathを作成するのはこちら。

 StringToPathConverter.cs

namespace WpfTextClip
{
    using System;
    using System.Collections.Generic;
    using System.Linq;
    using System.Windows.Data;
    using System.Windows.Media;
    using System.Windows.Shapes;

    public class StringToPathConverter
    {
        public static System.Windows.Shapes.Path ConvertToPath2(string text)
        {
            // string -> GraphicsPath
            var basePath = new System.Drawing.Drawing2D.GraphicsPath();
            var fontFamily = new System.Drawing.FontFamily("MS ゴシック");
            basePath.AddString(text, fontFamily, (int)System.Drawing.FontStyle.Regular,
                150, System.Drawing.Point.Empty, System.Drawing.StringFormat.GenericDefault);

            // GraphicsPath -> Path
            var pathGeometry = new PathGeometry();
            PathFigure pathFigure = null;

            for (int i = 0; i < basePath.PointCount; i++)
            {
                System.Drawing.Drawing2D.PathPointType pathtype =
                    ((System.Drawing.Drawing2D.PathPointType)basePath.PathTypes[i]) & System.Drawing.Drawing2D.PathPointType.PathTypeMask;
                System.Drawing.Drawing2D.PathPointType control =
                    ((System.Drawing.Drawing2D.PathPointType)basePath.PathTypes[i]) & System.Drawing.Drawing2D.PathPointType.CloseSubpath;

                switch (pathtype)
                {
                    case System.Drawing.Drawing2D.PathPointType.Start:
                        pathFigure = new PathFigure();
                        pathFigure.StartPoint = new System.Windows.Point(basePath.PathPoints[i].X,
                                                                         basePath.PathPoints[i].Y);
                        break;
                    case System.Drawing.Drawing2D.PathPointType.Line:
                        pathFigure.Segments.Add(new LineSegment(new System.Windows.Point(basePath.PathPoints[i].X,
                                                              basePath.PathPoints[i].Y), true));
                        break;
                    case System.Drawing.Drawing2D.PathPointType.Bezier:
                        if (basePath.PointCount-1 < (i + 2)){
                            // index out of range.
                            continue;
                        }
                        var ii = ((System.Drawing.Drawing2D.PathPointType)basePath.PathTypes[i+1]) & System.Drawing.Drawing2D.PathPointType.PathTypeMask;
                        var iii = ((System.Drawing.Drawing2D.PathPointType)basePath.PathTypes[i+2]) & System.Drawing.Drawing2D.PathPointType.PathTypeMask;
                        if (ii == System.Drawing.Drawing2D.PathPointType.Bezier &&
                            iii == System.Drawing.Drawing2D.PathPointType.Bezier)
                        {
                            pathFigure.Segments.Add(new BezierSegment(
                                new System.Windows.Point(basePath.PathPoints[i].X, basePath.PathPoints[i].Y),
                                new System.Windows.Point(basePath.PathPoints[i+1].X, basePath.PathPoints[i+1].Y),
                                new System.Windows.Point(basePath.PathPoints[i+2].X, basePath.PathPoints[i+2].Y),
                                true));
                        }
                        break;
                }
                switch (control)
                {
                    case System.Drawing.Drawing2D.PathPointType.DashMode:
                    // not supported.
                    case System.Drawing.Drawing2D.PathPointType.PathMarker:
                        // ignore.
                        break;
                    case System.Drawing.Drawing2D.PathPointType.CloseSubpath:
                        pathGeometry.Figures.Add(pathFigure);
                        break;
                }
            }
            Path path = new Path();
            path.Data = pathGeometry;
            return path;
        }

    }
}

フー。FontFamilyやサイズは適当に固定値にしていますが必要に応じて値を変更してくださいませ。これを実行するとこんな感じになります。

runmainwindow

わかりにくいですがCanvasそのものがClipされています。

WPF ウィンドウ全体にマスク処理

あるWindowの上にAeroGlassのWindowが来ると、下のWindowがボケた感じになります。そんなボケた感じを2つのWindowを使わずに作ろうとするとどうしたらいいかなぁと思ったのがキッカケの実用性無視したエントリ。

Window自体をAeroGlassにはできますが今回目的としているその上のElement群には影響を与えられないので、方針は今あるElementの上にぼかしフィルタを付けること。今ある画面をキャプチャしてぼかしてやろうということです。


1.ぼかす対象を作る

ぼかす対象としてはGridを想定してみます。

 MainWindow.xaml

<Window x:Class="WindowMask.MainWindow"
        xmlns="http://schemas.microsoft.com/winfx/2006/xaml/presentation"
        xmlns:x="http://schemas.microsoft.com/winfx/2006/xaml"
        xmlns:me="clr-namespace:WindowMask"
        Title="MainWindow" Height="350" Width="525">
    <Grid>
        <Grid.ColumnDefinitions>
            <ColumnDefinition Width="420"/>
            <ColumnDefinition Width="*"/>
        </Grid.ColumnDefinitions>
        <Grid.RowDefinitions>
            <RowDefinition Height="10*"/>
            <RowDefinition Height="*"/>
        </Grid.RowDefinitions>
        <Button Content="Mask/Unmask" Grid.Column="1" Grid.Row="1"/>
        <Grid x:Name="MaskTargetGrid" Grid.ColumnSpan="2" Background="Gray">
            <Calendar HorizontalAlignment="Left" Margin="38,95,0,0" VerticalAlignment="Top"/>
            <CheckBox Content="CheckBox" HorizontalAlignment="Left" Margin="226,38,0,0" VerticalAlignment="Top" RenderTransformOrigin="0.135,-0.667"/>
            <DataGrid HorizontalAlignment="Left" Height="62" Margin="267,70,0,0" VerticalAlignment="Top" Width="125"/>
            <Ellipse Fill="#FFF4F4F5" HorizontalAlignment="Left" Height="127" Margin="421,95,0,0" Stroke="Black" VerticalAlignment="Top" Width="67"/>
            <Label Content="Label" HorizontalAlignment="Left" Margin="392,29,0,0" VerticalAlignment="Top"/>
            <Button Content="Button" HorizontalAlignment="Left" Margin="36,33,0,0" VerticalAlignment="Top" Width="75"/>
            <Rectangle Fill="#FFF4F4F5" HorizontalAlignment="Left" Height="100" Margin="274,159,0,0" Stroke="Black" VerticalAlignment="Top" Width="118"/>
        </Grid>
    </Grid>
</Window>

mainwindow

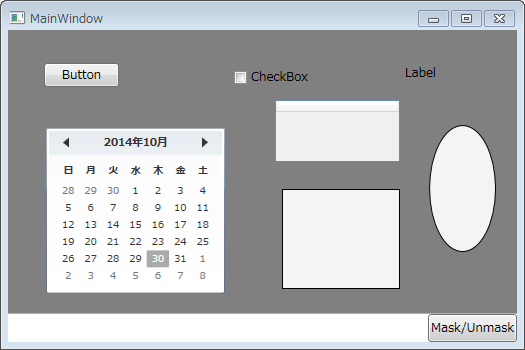
Mask/Unmaskボタンを押すと、灰色背景部分(Grid)がまるっとマスクが掛かるという想定。ボタンに処理を載せているのでセオリー通りICommandを実装するコマンドとしてマスク処理を作ります。


2.ぼかす処理を作る

MaskCommand.cs

namespace WindowMask
{
    using System;
    using System.Windows;
    using System.Windows.Media;
    using System.Windows.Controls;
    using System.Windows.Input;
    using System.Windows.Media.Imaging;
    using System.IO;
    using System.Drawing;
    using System.Drawing.Imaging;
    public class MaskCommand : ICommand
    {
        private bool masking;
        private Grid maskingGrid = new Grid();

        public bool CanExecute(object parameter){
            return parameter is Window;
        }

        public event EventHandler CanExecuteChanged{
            add { CommandManager.RequerySuggested += value; }
            remove { CommandManager.RequerySuggested -= value; }
        }

        public void Execute(object parameter){
            var window = parameter as Window;
            if (masking){
                UnMask(window);
            }
            else{
                Mask(window);
            }
            masking = !masking;
        }

        private void Mask(Window window)
        {
            // Render対象のGridの見た目を保存
            var grid = GetRenderTarget(window);
            var bitmap = new RenderTargetBitmap(
                (int)grid.ActualWidth, (int)grid.ActualHeight, 96, 96, PixelFormats.Pbgra32);
            bitmap.Render(window);
            var encoder = new BmpBitmapEncoder();
            encoder.Frames.Add(BitmapFrame.Create(bitmap));
            using(var originalGridVisualStream = new MemoryStream())
            using (var maskedGridVisualStream = new MemoryStream())
            {
                encoder.Save(originalGridVisualStream);
                // マスク処理
                using (Bitmap image = new Bitmap(originalGridVisualStream))
                {
                    var bluredImage = MaskEffect.Blur(image);
                    bluredImage.Save(maskedGridVisualStream, ImageFormat.Bmp);
                }
                originalGridVisualStream.Close();
                // マスク処理した画像をGridに張り、最前面へ配置
                WriteableBitmap maskedBitmap = new WriteableBitmap(BitmapFrame.Create(maskedGridVisualStream));
                maskingGrid.Background = new ImageBrush(maskedBitmap);
                grid.Children.Add(maskingGrid);
            }
        }

        private void UnMask(Window window)
        {
            // 設定したマスクを除去するだけ
            var grid = GetRenderTarget(window);
            grid.Children.Remove(maskingGrid);
        }

        private Grid GetRenderTarget(Window window)
        {
            // ここでは、Windowの2階層下にあるGridを前提とする
            var grid = window.Content as Grid;
            foreach (var element in grid.Children)
            {
                if (element is Grid){
                    return element as Grid;
                }
            }
            throw new InvalidProgramException("Render対象のGridがない");
        }
    }
}

Mask処理がポイントです。今の見た目をBitmapとして保存→画像処理してぼかす→Gridに張り付けて最前面配置という作用をしています。

具体的なマスク処理は適当に書くと↓な感じ。ポインタ操作をしているのでプロジェクトのプロパティのビルドタブでアンセーフコードの実行を許可する必要があります。

MaskEffect.cs

namespace WindowMask
{
    using System;
    using System.Collections.Generic;
    using System.Drawing;
    using System.Drawing.Imaging;
    using System.Linq;
    using System.Text;

    public class MaskEffect
    {
        public unsafe static Bitmap Blur(Bitmap srcImage)
        {
            Bitmap dstImage = new Bitmap(srcImage);
            var srcData = srcImage.LockBits(new Rectangle(Point.Empty, srcImage.Size),
                ImageLockMode.ReadWrite, PixelFormat.Format32bppPArgb);
            var dstData = dstImage.LockBits(new Rectangle(Point.Empty, dstImage.Size),
                ImageLockMode.ReadWrite, PixelFormat.Format32bppPArgb);
            byte* pbySrc = (byte*)srcData.Scan0;
            byte* pbyDst = (byte*)dstData.Scan0;

            // ぼかし処理(例)
            int operatorSize = 10;
            for (int y = operatorSize; y < srcImage.Height - operatorSize; y++){
                for (int x = operatorSize; x < srcImage.Width - operatorSize; x++){
                    for (int i = 0; i < 4; i++){
                        int sum = 0;
                        for (int offsety = -operatorSize; offsety <= operatorSize; offsety++){
                            for(int offsetx = -operatorSize; offsetx <= operatorSize; offsetx++){
                                sum += pbySrc[(y+offsety) * srcData.Stride + 4 * (x+offsetx) + i];
                            }
                        }
                        pbyDst[y*dstData.Stride+4*x+i] = (byte)( sum / (2*operatorSize+1) / (2*operatorSize+1) );
                    }
                }
            }

            srcImage.UnlockBits(srcData);
            dstImage.UnlockBits(dstData);
            return dstImage;
        }
    }
}

コマンドとして作成したのでこれを元のWindowのMask/Unmaskボタンに割り当てます。

 MainWindow.xaml(改)

<Window x:Class="WindowMask.MainWindow"
        xmlns="http://schemas.microsoft.com/winfx/2006/xaml/presentation"
        xmlns:x="http://schemas.microsoft.com/winfx/2006/xaml"
        xmlns:me="clr-namespace:WindowMask"
        Title="MainWindow" Height="350" Width="525">
    <Window.Resources>
        <me:MaskCommand x:Key="maskCommand"/>
    </Window.Resources>
    <Grid>
        <Grid.ColumnDefinitions>
            <ColumnDefinition Width="420"/>
            <ColumnDefinition Width="*"/>
        </Grid.ColumnDefinitions>
        <Grid.RowDefinitions>
            <RowDefinition Height="10*"/>
            <RowDefinition Height="*"/>
        </Grid.RowDefinitions>
        <Button Content="Mask/Unmask" Grid.Column="1" Grid.Row="1"
                Command="{StaticResource maskCommand}"
                CommandParameter="{Binding RelativeSource={RelativeSource Mode=FindAncestor, AncestorType={x:Type Window}}}"/>
        <Grid x:Name="MaskTargetGrid" Grid.ColumnSpan="2" Background="Gray">
            <Calendar HorizontalAlignment="Left" Margin="38,95,0,0" VerticalAlignment="Top"/>
            <CheckBox Content="CheckBox" HorizontalAlignment="Left" Margin="226,38,0,0" VerticalAlignment="Top" RenderTransformOrigin="0.135,-0.667"/>
            <DataGrid HorizontalAlignment="Left" Height="62" Margin="267,70,0,0" VerticalAlignment="Top" Width="125"/>
            <Ellipse Fill="#FFF4F4F5" HorizontalAlignment="Left" Height="127" Margin="421,95,0,0" Stroke="Black" VerticalAlignment="Top" Width="67"/>
            <Label Content="Label" HorizontalAlignment="Left" Margin="392,29,0,0" VerticalAlignment="Top"/>
            <Button Content="Button" HorizontalAlignment="Left" Margin="36,33,0,0" VerticalAlignment="Top" Width="75"/>
            <Rectangle Fill="#FFF4F4F5" HorizontalAlignment="Left" Height="100" Margin="274,159,0,0" Stroke="Black" VerticalAlignment="Top" Width="118"/>
        </Grid>
    </Grid>
</Window>

これで実行してMask/Unmaskを押すと、以下のような感じ。

maskedwindow

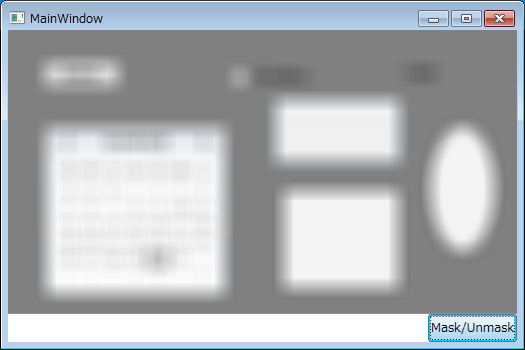
WPFは表現力が優れているのはわかるけどElementの境界を越えて見た目を変更する・・・というのはこんな方法しかないんじゃないかな。だから何?という突っ込みは禁止です。

11/11追記
ぼかすだけならGrid.EffectにBlurEffectをかければもっとスマートにできますね。今回のテクニックは、Element領域を超えた描画をしたいとか、要素全体に対してイベントハンドラを無効化したいとかいった場合に使い道がある。。。かも、なさそう・・・。

WPF、XAML記述オブジェクトの生成順序

業務多忙によりネタの新鮮味が無くなってきた気がするこの頃。WPFアプリケーションの開始・初期化順について確認しておきます。

さっそくですが、いくつかログを埋め込んだだけのクラスを用意します。

DummyObject.cs

namespace WpfAppStarting
{
    using System;
    public class DummyObject
    {
        public DummyObject()
        {
            Console.WriteLine("DummyObject-Constructor called.");
        }
        public DummyProperty Property { get; set; }
    }
}

DummyProperty.cs

namespace WpfAppStarting
{
    using System;
    using System.ComponentModel;
    [TypeConverter(typeof(DummyTypeConverter))]
    public class DummyProperty
    {
        public DummyProperty()
        {
            Console.WriteLine("DummyPropety-Constructor called.");
        }
    }
}

DummyValueConverter.cs(string->DummyPropertyのIValueConverter)

namespace WpfAppStarting
{
    using System;
    using System.Windows.Data;
    public class DummyValueConverter : IValueConverter
    {
        public DummyValueConverter()
        {
            Console.WriteLine("DummyValueConverter-Constructor called.");
        }
        public object Convert(object value, Type targetType, object parameter, System.Globalization.CultureInfo culture)
        {
            Console.WriteLine("DummyValueConverter-Convert called.");
            DummyProperty obj = value as DummyProperty;
            return obj.ToString();
        }
        public object ConvertBack(object value, Type targetType, object parameter, System.Globalization.CultureInfo culture)
        {
            throw new NotImplementedException();
        }
    }
}

DummyTypeConverter.cs(string->DummyPropertyのTypeConverter)

namespace WpfAppStarting
{
    using System;
    using System.ComponentModel;
    public class DummyTypeConverter : TypeConverter
    {
        public DummyTypeConverter()
        {
            Console.WriteLine("TypeConverter-Constructor called.");
        }
        public override bool CanConvertFrom(ITypeDescriptorContext context, Type sourceType)
        {
            Console.WriteLine("TypeConverter-CanConvertFrom called.");
            if (sourceType == typeof(string)){
                return true;
            }
            return base.CanConvertFrom(context, sourceType);
        }
        public override object ConvertFrom(ITypeDescriptorContext context, System.Globalization.CultureInfo culture, object value)
        {
            Console.WriteLine("TypeConverter-ConvertFrom called.");
            if (value is string){
                return new DummyProperty();
            }
            return base.ConvertFrom(context, culture, value);
        }
    }
}

これらはバインドの様子を確認するためのものです。XAMLで使うであろうIValueConverterとTypeConverterを定義していますがこれらが何者かはこちらを参照ください。これらに加えて、WPFコントロールのコンストラクタでログを出力するようにしたクラスも追加し、構成は以下にしておきました。

project_kousei

そしてようやくメインとなる、MainWindowはこちら。

MainWindow.xaml.cs

window (←より↓が重要)

<Window x:Class="WpfAppStarting.MainWindow"
        xmlns="http://schemas.microsoft.com/winfx/2006/xaml/presentation"
        xmlns:x="http://schemas.microsoft.com/winfx/2006/xaml"
        xmlns:me="clr-namespace:WpfAppStarting"
        Title="MainWindow" Height="240" Width="525">
    <Window.Resources>
        <!--↓ここでPropertyにstringを設定してTypeConverterが働きます,以下同じ-->
        <me:DummyObject x:Key="TestResourceObject1" Property="TestString1"/>
        <me:DummyValueConverter x:Key="TestValueConverter"/>
        <me:DummyObject x:Key="TestResourceObject2" Property="TestString2"/>
        <me:DummyObject x:Key="TestResourceObject3" Property="TestString3"/>
    </Window.Resources>
    <me:ExtendedGrid>
        <me:ExtendedStackPanel>
            <me:ExtendedTextBox>
                <!--↓ここでConverterに指定してDummyValueConverterが働きます,以下同じ-->
                <Binding Source="{StaticResource TestResourceObject1}" Path="Property" Converter="{StaticResource TestValueConverter}"/>
            </me:ExtendedTextBox>
            <me:ExtendedTextBox>
                <Binding Source="{StaticResource TestResourceObject1}" Path="Property" Converter="{StaticResource TestValueConverter}"/>
            </me:ExtendedTextBox>
        </me:ExtendedStackPanel>
        <me:ExtendedStackPanel Margin="0,50,0,0">
            <me:ExtendedTextBox>
                <Binding Source="{StaticResource TestResourceObject3}" Path="Property" Converter="{StaticResource TestValueConverter}"/>
            </me:ExtendedTextBox>
        </me:ExtendedStackPanel>
    </me:ExtendedGrid>
</Window>

これを実行すると以下のようなログが出ます。見やすいかと思って勝手にインデント付けていますが順序は当然入れ替えていません。

'WpfAppStarting.vshost.exe' (CLR v4.0.30319: WpfAppStarting.vshost.exe): 'C:\Windows\Microsoft.Net\assembly\GAC_64\mscorlib\v4.0_4.0.0.0__b77a5c561934e089\mscorlib.dll' が読み込まれました。シンボルが読み込まれました。
<<...途中省略>>
'WpfAppStarting.vshost.exe' (CLR v4.0.30319: WpfAppStarting.vshost.exe): 'C:\Windows\Microsoft.Net\assembly\GAC_MSIL\mscorlib.resources\v4.0_4.0.0.0_ja_b77a5c561934e089\mscorlib.resources.dll' が読み込まれました。モジュールがシンボルなしでビルドされました。
'WpfAppStarting.vshost.exe' (CLR v4.0.30319: WpfAppStarting.vshost.exe): 'C:\Windows\Microsoft.Net\assembly\GAC_MSIL\UIAutomationTypes\v4.0_4.0.0.0__31bf3856ad364e35\UIAutomationTypes.dll' が読み込まれました。シンボルが読み込まれました。
<<ここからユーザーログが出だす>>
   MainWindow-Constructor called(before InitializeComponent).
      ExtendedGrid-Constructor called.
         ExtendedStackPanel-Constructor called.
            ExtendedTextBox-Constructor called.
               DummyObject-Constructor called.
               TypeConverter-Constructor called.
               TypeConverter-ConvertFrom called.
               DummyPropety-Constructor called.
               DummyValueConverter-Constructor called.
               DummyValueConverter-Convert called.
            ExtendedTextBox-Constructor called.
               DummyValueConverter-Convert called.
         ExtendedStackPanel-Constructor called.
            ExtendedTextBox-Constructor called.
               DummyObject-Constructor called.
               TypeConverter-ConvertFrom called.
               DummyPropety-Constructor called.
               DummyValueConverter-Convert called.
MainWindow-Initialized event occured.
   MainWindow-Constructor called(after InitializeComponent).
MainWindow-SourceInitialized event occured.
MainWindow-Activated event occured.
MainWindow-Loaded event occured.
MainWindow-ContentRendered event occured.
MainWindow-Activated event occured.

これからわかることとして、

  1. WPFのXAMLの解釈は上から順に行われている、リソースで定義されたオブジェクトが優先して作成されている訳ではない。
  2. オブジェクト参照は必要になったタイミングで解決している、よってリソースとして定義しても使われなければオブジェクトは作成されない。

があります。MainWindowのコンストラクタで呼んでいるInitializeComponentでは、

  1. MainWindow.xamlの解釈&オブジェクト参照を解決
  2. XAML構文エラーにならなければInitializedイベントを発砲して終了

しています、改めて見返すとちょっとスッキリ。

ちなみにMainWindowのコンストラクタを呼ぶのは自動生成されるソースのapp.i.csですね。またこのMainWindowの生成後に発生するイベントの順序はMSDNに記載がありますので、そちらを参照ください。

コンテキストメニュー「送る」C#

私が初めてWindowsアプリを作ったのはMFCダイアログベースのファイル変換ツールでした。ファイル変換ツールなので、ファイルを入力としますが、「送る」メニューに登録することでツールが簡単に使えるようになったのを覚えています。今日はそのC#版。

sendto_example

1.ファイルを受け取るアプリ

まずファイルを受けるソフトから。これは皆様が作るアプリなのでここでは簡単にTXTファイルを受け取って中身を表示するものとして作っておきます。

text_display_form

TextDisplayForm.cs

namespace SendToSupportWinFormsApp
{
    using System;
    using System.Linq;
    using System.Text;
    using System.Windows.Forms;
    using System.IO;

    public partial class TextDisplayForm : Form
    {
        public TextDisplayForm()
        {
            InitializeComponent();
        }

        private void TextDisplayForm_Shown(object sender, EventArgs e)
        {
            var args = Environment.GetCommandLineArgs();
            if(args.Length >= 2) {
                textBoxArgs.Text = args.Skip(1).Aggregate((a, b) => a + b);
                if(args.Count() >= 2 && Path.GetExtension(args[1]).ToLower() == ".txt") {
                    textBoxFileText.Text = File.ReadAllText(args[1], Encoding.GetEncoding("Shift-JIS"));
                }
            }
        }
    }
}

[送る]を選択したときのファイルがプログラム名に次ぐ引数として渡されます。引数はEnvironment.GetCommandLineArgs()でstring配列として渡されますので1番目がパスとして扱えばokです。


.送るメニューへのショートカット追加

「送る」メニューに上のソフトが表示されるためには、スタートボタンから”プログラムとファイルの検索”に shell:sendto と入力すると開くフォルダにショートカットを作成すればokです。「送る」メニューへの登録/解除はインストール/アンインストールのタイミングが自然でしょうということで、VS2010でセットアッププロジェクトを作成します。

  1. セットアッププロジェクトを右クリック、「追加」->「プロジェクト出力」を選択
  2. 先ほど作ったWinFormsアプリのプロジェクトのプライマリ出力を選択してOK。
  3. 2でできたプライマリ出力をダブルクリック、ファイルシステムが開く
  4. ファイルシステムの左ペーンの”対象コンピューター上のファイルシステム”を右クリックして「特別なフォルダの追加」->「ユーザーの送るメニュー」を選択
  5. 同じくファイルシステムの左ペーンの”アプリケーションフォルダー”を選択、右ペーンに先ほど作ったWinFormsのプライマリ出力があるので右クリックしてショートカットを作成
  6. 5で作ったショートカットを4で作ったユーザーの送るメニューへドラッグアンドドロップ

shortcut_by_project

昔はよかったのですが、.NET4.0以降上記手順で作成されるのは”アドパタイズショートカット”というやつらしく、SendToフォルダへは登録されるものの「送る」メニューに登録されません、ありゃ困った。


3.プログラマならコードでしょう

2の問題のため、Orcaを使う方法やvbsを使う方法が紹介されています。が、私はマネージコードしか書きたくないのでC#の方法を紹介。簡単な話で、Installerクラスを使います。このInstallerクラスはセットアッププロジェクトではなくインストールするアプリケーションそのもの、今回でいうとWinFormsアプリのプロジェクトに追加します。ショートカットも作成するので以下を参照追加。

[COM] Windows Script Host Object Model
[.NET] System.Configuration.Install

前者はプロジェクトの参照設定に “IWshRuntimeRubrary” と表示されますが、このプロパティを開き [相互運用機能の埋め込み] をFalseにしておきます。

ひとてま2

コードはこちら。

AddSendToInstaller.cs

namespace SendToSupportWinFormsApp
{
    using System;
    using System.IO;
    using System.Configuration.Install;
    using System.Reflection;
    using System.ComponentModel;
    using IWshRuntimeLibrary;

    [RunInstaller(true)]
    public class AddSendToInstaller : Installer
    {
        private const string shortcutFilePathKey = "shortcutFilePath";
        public override void Install(System.Collections.IDictionary stateSaver) {
            // Debug時は以下を有効に
            // System.Diagnostics.Debugger.Launch();

            string targetPath = Assembly.GetExecutingAssembly().Location;
            string fileName = Path.GetFileNameWithoutExtension(targetPath);
            string shortcutPath = Environment.GetFolderPath(Environment.SpecialFolder.SendTo) + @"\" + fileName + ".lnk";
            IWshShell shell = new WshShellClass();
            IWshShortcut shortcut = shell.CreateShortcut(shortcutPath) as IWshShortcut;
            shortcut.TargetPath = targetPath;
            shortcut.Save();

            stateSaver[shortcutFilePathKey] = shortcutPath;
            base.Install(stateSaver);
        }

        public override void Uninstall(System.Collections.IDictionary savedState) {
            // Debug時は以下を有効に
            // System.Diagnostics.Debugger.Launch();

            if(savedState.Contains(shortcutFilePathKey)) {
                string shortcutFilePath = savedState[shortcutFilePathKey] as string;
                if(System.IO.File.Exists(shortcutFilePath)) {
                    System.IO.File.Delete(shortcutFilePath);
                }
            }
            base.Uninstall(savedState);
        }
    }
}

この上でセットアッププロジェクトを変更します(2の手順で作ったショートカットは無駄ですので削除します)。

  1. セットアッププロジェクトを右クリックし、「表示」->「カスタム動作」をクリック
  2. カスタム動作のインストールとアンインストールそれぞれについて、右クリックしてカスタム動作の追加をクリックして、アプリケーションフォルダを選択してOK。

custom_action

これをしないと上で作ったインストーラクラスが無視されるので注意。これでセットアッププロジェクトを作ってインストールすると「送る」メニューにアプリが登録されます。

tuika2

実行するとこう。めでたし。

exe

ただVS2012以降セットアッププロジェクトがプロジェクトテンプレートからなくなってしまったのでVS2010までの手法ということになります。InstallShield LimitedEditionを使う必要がありますね。

Windowのキャプチャ(WinForms,WPF)

現在、台風19号が近畿圏に再接近中…。今回は息抜きに、WindowsFormsとWPFそれぞれについてwindowのキャプチャ方法を見ておきます。WPFは結構苦労しているような。


1.WindowsFormsの場合

ボタン押下でFormのキャプチャをするような関数は以下のような感じになります。

 Form1.cs

namespace WindowsFormsCapture
{
    using System;
    using System.Drawing;
    using System.Windows.Forms;
    using System.Drawing.Imaging;
    public partial class Form1 : Form
    {
        public Form1()
        {
            InitializeComponent();
        }

        private void buttonCapture_Click(object sender, EventArgs e)
        {
            using(Bitmap image = new Bitmap(Width,Height))
            using(Graphics graphics = Graphics.FromImage(image))
            {
                graphics.CopyFromScreen(Location, Point.Empty, image.Size);
                image.Save("Capture.bmp", ImageFormat.Bmp);
            }
        }
    }
}

実際のキャプチャ画像はこちら。

Capture


2.WPFの場合

WPFの場合も基本は同じ、ウィンドウの位置,サイズの取得方法が変わるだけです。

MainWindow.xaml.cs

namespace WpfCapture
{
    using System.Windows;
    using System.Windows.Media;
    using System.Drawing;
    using System.Drawing.Imaging;
    public partial class MainWindow : Window
    {
        public MainWindow()
        {
            InitializeComponent();
        }

        private void Button_Click(object sender, RoutedEventArgs e)
        {
            var brush = new VisualBrush(this);
            using (Bitmap image = new Bitmap((int)ActualWidth, (int)ActualHeight))
            using (Graphics graphics = Graphics.FromImage(image))
            {
                graphics.CopyFromScreen(new System.Drawing.Point((int)Left, (int)Top), System.Drawing.Point.Empty, image.Size);
                image.Save("Capture.bmp", ImageFormat.Bmp);
            }
        }
    }
}

こちらも蛇足ながらキャプチャ画像はこちら。

Capture

CLRイベントとWPF Routedイベントの違い

いきなりですが問題です。CLRイベントとWPFのRoutedイベント、Routedイベントにはトンネル/バブルモードはありますが、それ以外に違いはあるでしょうか?

はい、なにRoutedイベントはXAMLで指定できるがCLRイベントはXAMLで指定できない? えー残念ながら間違いです。例を見ながら確認しておきましょう。

ButtonWithClrEvent.cs

namespace RoutedEventAndClrEvent
{
    using System;
    using System.Windows.Controls;
    public class ButtonWithClrEvent : Button
    {
        // CLR Event
        public event EventHandler SampleClrEvent = (_, __) => { };

        // click -> Some clr event
        protected override void OnClick()
        {
            SampleClrEvent(this, EventArgs.Empty);
            base.OnClick();
        }
    }
}

これは普通のイベントですね。後の確認用に、clickイベントで該イベントを発砲しておきます。

ButtonWithRoutedEvent.cs

namespace RoutedEventAndClrEvent
{
    using System.Windows;
    using System.Windows.Controls;
    public class ButtonWithRoutedEvent : Button
    {
        // Routed Event
        public static readonly RoutedEvent SampleRoutedEvent =
            EventManager.RegisterRoutedEvent("SampleRouted",
            RoutingStrategy.Bubble,
            typeof(RoutedEventHandler),
            typeof(ButtonWithRoutedEvent));

        // CLR accessors
        public event RoutedEventHandler SampleRouted
        {
            add { AddHandler(SampleRoutedEvent, value); }
            remove { RemoveHandler(SampleRoutedEvent, value); }
        }

        // click -> RoutedEvent
        protected override void OnClick()
        {
            RaiseEvent(new RoutedEventArgs(SampleRoutedEvent));
            base.OnClick();
        }
    }
}

次いでRoutedイベント(日本語で読むときはルーティングイベント)、CLRアクセサでAddHandler, RemoveHandlerをラップするのは定石です。まずこれらがXAMLで指定できるか?というところを確認しておきます。

 MainWindow.xaml

<Window x:Class="RoutedEventAndClrEvent.MainWindow"
        xmlns="http://schemas.microsoft.com/winfx/2006/xaml/presentation"
        xmlns:x="http://schemas.microsoft.com/winfx/2006/xaml"
        xmlns:me="clr-namespace:RoutedEventAndClrEvent"
        Title="MainWindow" Height="138" Width="235">
    <StackPanel>
        <me:ButtonWithRoutedEvent x:Name="RoutedEventButton" SampleRouted="SampleRoutedEventHandler">Routed Event</me:ButtonWithRoutedEvent>
        <me:ButtonWithClrEvent x:Name="ClrEventButton" SampleClrEvent="SampleClrEventHanlder">CLR Event</me:ButtonWithClrEvent>
    </StackPanel>
</Window>

 MainWindow.xaml.cs

namespace RoutedEventAndClrEvent
{
    using System;
    using System.Windows;
    public partial class MainWindow : Window
    {
        public MainWindow()
        {
            InitializeComponent();
        }

        // Routedイベントハンドラ
        private void SampleRoutedEventHandler(object sender, RoutedEventArgs e){
            MessageBox.Show("Routed Event Occured int the instance context.");
        }

        // CLRイベントハンドラ
        private void SampleClrEventHanlder(object sender, EventArgs e){
            MessageBox.Show("CLR Event Occured int the instance context.");
        }
    }
}

mainwindow

問題なく動作します。

ではCLRイベントとRoutedイベントは何が違うのでしょうか?上の例ではイベントハンドラにインスタンスメソッドを割り当てていますが、staticメソッドを割り当てた時に違いが見えてきます。大量のコピペになるので省略しますが、両ハンドラを単純にstaticにしてみてください。いずれも実行時にXAMLエラーが発生します。それぞれstaticメソッドをアタッチするときは下のようにします。

 MainWindow.xaml.cs

namespace RoutedEventAndClrEvent
{
    using System;
    using System.Windows;
    public partial class MainWindow : Window
    {
        public MainWindow()
        {
            InitializeComponent();
            RoutedEventButton.SampleRouted += SampleRoutedEventHandler;

            // Routedイベントハンドラ<クラスレベルハンドラ>
            EventManager.RegisterClassHandler(
                typeof(ButtonWithRoutedEvent),
                ButtonWithRoutedEvent.SampleRoutedEvent,
                new RoutedEventHandler(SampleStaticRoutedEventHandler));
            // CLRイベントハンドラ
            ClrEventButton.SampleClrEvent += SampleStaticClrEventHanlder;
        }

        // Routedイベントハンドラ
        private static void SampleStaticRoutedEventHandler(object sender, RoutedEventArgs e){
            MessageBox.Show("Routed Event Occured in the static context.");
        }
        private void SampleRoutedEventHandler(object sender, RoutedEventArgs e){
            MessageBox.Show("Routed Event Occured int the instance context.");
        }

        // CLRイベントハンドラ
        private static void SampleStaticClrEventHanlder(object sender, EventArgs e){
            MessageBox.Show("CLR Event Occured int the static context.");
        }
    }
}

CLRイベントのほうは何も変わっていないので良いとして、Routedイベントはクラスレベルハンドラというものが登場します。これがCLRイベントとRoutedイベントの違いです!

クラスレベルハンドラとは、他のインスタンスハンドラよりも先だって呼ばれるハンドラです。RoutedEventはRoutedEventArgs内のHandledをtrueにするとイベントルーティングを停止させられますが、当然クラスレベルハンドラにもあります。よって各インスタンスハンドラに渡る前に統一的に処理をする場合に使えるということです。トンネルとバブルも含めてイベントの発生順を図示すると以下のようになります。

event